 Tutorials - Storage
We show here different ways to store and place ThorPy elements.
In a first step, we will see how to use thorpy.store function in order to automatically store group of elements. Then, box elements are introduced. Finally, manual placing of elements is shown.
Basics
First let us declare some elements which will serve as example. Line 6 define 12 elements. In order to deal with a general case, we slightly randomize their size on lines 7-10. Then, we create a background element that contains all of them on line 11.
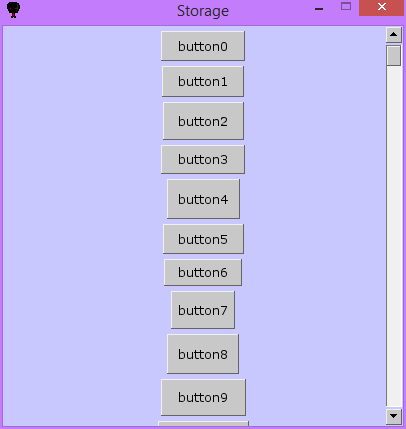
At the moment, all the elements have coordinates x=0 and y=0. We want to store them. Thus, the only line that is really of interest here is line 13. It simply tells : 'store all the elements of the background, vertically (default behaviour) and starting at coordinate y = 0. Line 14 add a scroll lift if needed. As you can see on the figure, the elements are stored in a column. We will see below how to store them in many different ways.
1 2 3 4 5 6 7 8 9 10 11 12 13 14 15 16 17 18 19 | #ThorPy storage tutorial : basics - step1
import thorpy, random
application = thorpy.Application(size=(400, 400), caption="Storage")
elements = [thorpy.make_button("button" + str(i)) for i in range(12)]
for e in elements:
w, h = e.get_rect().size
w, h = w*(1+random.random()/2.), h*(1+random.random()/2.)
e.set_size((w,h))
background = thorpy.Background(color=(200, 200, 255),elements=elements)
thorpy.store(background, y=0)
background.refresh_lift() #add/remove scroll lift is needed/not needed
menu = thorpy.Menu(background)
menu.play()
application.quit()
|

Before going through the use of the function thorpy.store, let us first examine how it can be invoked in detail. The code below comments each one of the arguments you can pass to this helpful function:
1 2 3 4 5 6 7 8 | thorpy.store(frame, #can be either an element or a pygame.Rect
elements=None, #None (default) will store the children of <frame>
mode="v", #can be either "v" ("vertical") or "h" ("horizontal")
x="auto", #x coordinate begin
y="auto", #y coordinate begin
margin=None, #the margin to be used (this is a single value)
gap=None, #the gap to be used (this is a single value)
align="center") #"left", "right", "top", "bottom" or "center"
|
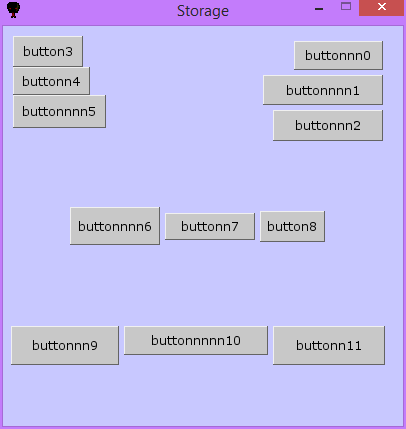
Note that frame argument is the rect or the element relatively to which the elements will be centered, if no specification is given for x and y arguments. Also, if you give an element as frame and you do not specify the elements, the function will consider all the children of this elements for storage. Value "auto" for arguments x and y will center the elements on the frame. None value for margin and gap mean they will take the default values that are specified in thorpy.style. For horizontal storing, align can take values "center", "top" or "bottom, while for vertical storing, align can take values "center", "left", "right"
The code below is mainly the same as the one used in the first step, except that line 13 has been replaced by several calls to thorpy.store that illustrates the use of the function.
1 2 3 4 5 6 7 8 9 10 11 12 13 14 15 16 17 18 19 20 21 | #ThorPy storage tutorial : basics - step 2
import thorpy, random
application = thorpy.Application(size=(400, 400), caption="Storage")
elements = [thorpy.make_button("button" + str(i)) for i in range(12)]
for e in elements:
w, h = e.get_rect().size
w, h = w*(1+random.random()/2.), h*(1+random.random()/2.)
e.set_size((w,h))
background = thorpy.Background(color=(200, 200, 255),elements=elements)
thorpy.store(background, elements[0:3], x=380, y=10, align="right")
thorpy.store(background, elements[3:6], x=10, y=10, align="left", gap=0)
thorpy.store(background, elements[6:9], mode="h", y=200)
thorpy.store(background, elements[9:12], mode="h", y=300, align="top")
menu = thorpy.Menu(background)
menu.play()
application.quit()
|

Boxes
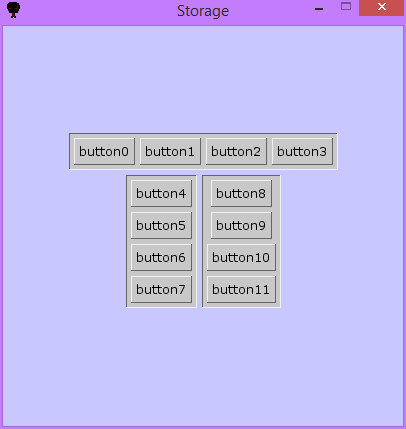
When you use objects of type thorpy.Box, they will automatically store their elements. However, you may want to change the type of storage. In the example below we use three boxes : the first one stores its elements horizontally, and below are the two other boxes, aligned horizontaly together and storing their own elements vertically (see the figure).
Line 9 changes the storage type for the first box : by default, boxes store their elements vertically, so we specify that here we want it to store elements horizontally. Then we tell the box to adjust its size to its children (line 10).
We want the two last boxes to store their elements vertically, so we do not have to specify anything since it's the default behaviour of boxes. However, we want the boxes themselves to be aligned horizontally. One solution for this is to declare an element whose children are these two boxes regrouped horizontally (line 16).
1 2 3 4 5 6 7 8 9 10 11 12 13 14 15 16 17 18 19 20 21 22 23 24 25 | #ThorPy storage tutorial : boxes
import thorpy
application = thorpy.Application(size=(400, 400), caption="Storage")
elements = [thorpy.make_button("button" + str(i)) for i in range(12)]
box1 = thorpy.Box(elements[0:4])
thorpy.store(box1, mode="h")
box1.fit_children()
box2 = thorpy.Box(elements[4:8])
box3 = thorpy.Box(elements[8:12])
box_2_3 = thorpy.make_group([box2,box3], mode="h")
boxes = [box1, box_2_3]
background = thorpy.Background(color=(200, 200, 255), elements=boxes)
thorpy.store(background)
menu = thorpy.Menu(background)
menu.play()
application.quit()
|

Fine/manual placing
Elements can of course be placed by hand. We show here several ways to do it.
At line 14, we set the topleft coordinate of the 0th element to be at pixels x = 10 and y = 300. The line below places the topleft coordinates of element number 1 at the bottom right coordinates of element number 0. At line 16, we show how to set the center of an element instead of its topleft coordinate. Remember that you can also move elements, like for example elements[1].move((10, 20)). Also, when setting topleft or center coordinate, you can ignore a certain axis : elements[1].set_center((20, None)) will set the x center of the element on pixel 20, but won't modify its y coordinate.
If your application is not intended for a specific screen resolution, it is much safer to never place elements by absolute coordinates, but to place them proportionnaly to the screen size. For example, instead of line 14, you may write elements[0].set_topleft((10./400*W, 300./400*H), with W and H the size of the screen obtained with thorpy.functions.get_screen_size(). Moreover, the method set_location permit to do it in a less verbose way (see line 25).
Another useful method is stick_to(target, target_side, self_side), that place an element relatively to another one. Lines 17-18 demonstrates its use. Note that you can stick to screen by provinding 'screen' as target_side argument.
To finish, at line 22, we tell that we want the element number 5 to be centered on element number 6, which is the fat element we resized on line 12. Moreover, in order to see the element 5, we precise at line 23 that it has to be blitted after element 6 by setting its rank higher than the rank of element 5. Then, at line 24 we refresh the children order of the background so the change in element5's rank is effective.
1 2 3 4 5 6 7 8 9 10 11 12 13 14 15 16 17 18 19 20 21 22 23 24 25 26 27 28 29 30 | #ThorPy storage tutorial : manual placing
import thorpy, random
application = thorpy.Application(size=(400, 400), caption="Storage")
elements = [thorpy.make_button("button" + str(i)) for i in range(13)]
for e in elements:
w, h = e.get_rect().size
w, h = w*(1+random.random()/2.), h*(1+random.random()/2.)
e.set_size((w,h))
elements[6] = thorpy.Element(text="")
elements[6].set_size((100,100))
elements[0].set_topleft((10, 300))
elements[1].set_topleft(elements[0].get_rect().bottomright)
elements[2].set_center((100, 200))
elements[3].stick_to(elements[2], target_side="bottom", self_side="top")
elements[4].stick_to(elements[2], target_side="right", self_side="left")
background = thorpy.Background(color=(200, 200, 255), elements=elements)
thorpy.store(background, elements[6:12], x=380, align="right")
elements[5].center(element=elements[6])
elements[5].rank = elements[6].rank + 0.1 #be sure number 5 is blitted after 6
background.sort_children_by_rank() #tell background to sort its children
elements[12].set_location((0.1, 0.2)) #relative placing of number 12
menu = thorpy.Menu(background)
menu.play()
application.quit()
|

